[목차]
1. Zabbix Server 구성 (RHEL8)
2. 브라우저에서 설정
[사전 준비사항]
- SELINUX 비활성화
- Firewalld 비활성화
Zabbix Agent 구성
1. Zabbix Server 구성 (RHEL8)
1) 필요한 패키지 다운로드(php, httpd, mysql)
dnf install -y httpd mariadb-server php php-cli php-common php-mbstring php-mysqlnd php-xml php-bcmath php-devel php-pear php-gd

systemctl start mariadb httpd
2) mysql 보안 설정
mysql_secure_installation

(중략)
Enter current password for root (enter for none): (엔터 입력)
OK, successfully used password, moving on...

(중략)

Set root password? [Y/n] y
New password: (root 입력)
Re-enter new password: (root 입력)
Password updated successfully!
Reloading privilege tables..
 ... Success!

(중략)

Remove anonymous users? [Y/n] y
 ... Success!

(중략)

Disallow root login remotely? [Y/n] y
 ... Success!

(중략)

Remove test database and access to it? [Y/n] y
 - Dropping test database...
 ... Success!
 - Removing privileges on test database...
 ... Success!

(중략)

Reload privilege tables now? [Y/n] y
 ... Success!
(중략)
3) Zabbix DB, User 생성
mysql -u root -p

Enter password:
Welcome to the MariaDB monitor.  Commands end with ; or \g.
Your MariaDB connection id is 17
Server version: 10.3.32-MariaDB MariaDB Server

Copyright (c) 2000, 2018, Oracle, MariaDB Corporation Ab and others.

Type 'help;' or '\h' for help. Type '\c' to clear the current input statement.

MariaDB [(none)]> CREATE DATABASE zabbix_db CHARACTER SET utf8 collate utf8_bin;
Query OK, 1 row affected (0.000 sec)

MariaDB [(none)]> GRANT ALL ON zabbix_db.* TO 'zabbix_user'@'localhost' IDENTIFIED BY 'root';
Query OK, 0 rows affected (0.000 sec)

MariaDB [(none)]> FLUSH PRIVILEGES;
Query OK, 0 rows affected (0.000 sec)

MariaDB [(none)]> exit
Bye
4) Zabbix 레포지토리 구성
rpm -Uvh https://repo.zabbix.com/zabbix/5.0/rhel/8/x86_64/zabbix-release-5.0-1.el8.noarch.rpm

https://repo.zabbix.com/zabbix/5.0/rhel/8/x86_64/zabbix-release-5.0-1.el8.noarch.rpm(을)를 복구합니다
경고: /var/tmp/rpm-tmp.DmXnus: Header V4 RSA/SHA512 Signature, key ID a14fe591: NOKEY
Verifying...                          ################################# [100%]
준비 중...                         ################################# [100%]
Updating / installing...
   1:zabbix-release-5.0-1.el8         ################################# [100%]
5) Zabbix Server 패키지 설치
dnf install -y zabbix-server-mysql zabbix-web-mysql zabbix-agent zabbix-apache-conf

systemctl start zabbix-server zabbix-agent php-fpm
6) Zabbix DB 관련 설정
cd /usr/share/doc/zabbix-server-mysql/

zcat create.sql.gz | mysql -u zabbix_user -p zabbix_db
Enter password: (root 입력)
7) Zabbix Server DB 설정
vi /etc/zabbix/zabbix_server.conf

DBHost=localhost
DBName=zabbix_db
DBUser=zabbix_user
DBPassword=root
8) Zabbix Server 시간대 설정 & 프로세스 재기동
vi /etc/php-fpm.d/zabbix.conf

# 맨 아래 줄에 추가
php_value[date.timezone] = Asia/Seoul

systemctl restart zabbix-server zabbix-agent php-fpm httpd
2. 브라우저에서 설정
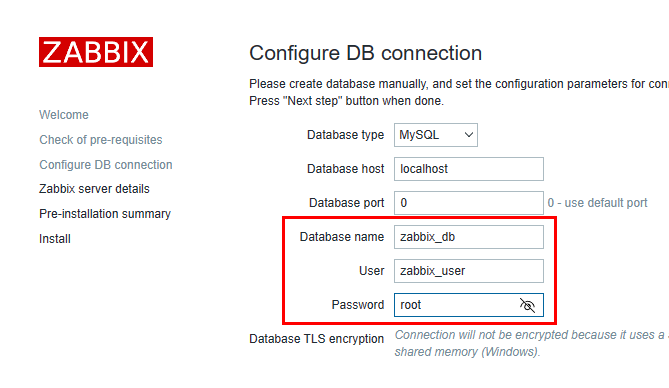
- http://(Zabbix Server IP)/zabbix 로 접근하여 아래 내용 입력
- 그 외, 전부 'Next Step'버튼 누른다.

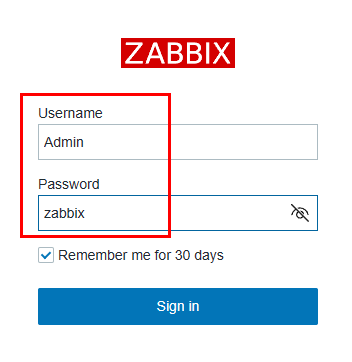
- 로그인은 Admin/zabbix 아래와 같이 넣어 접속한다.

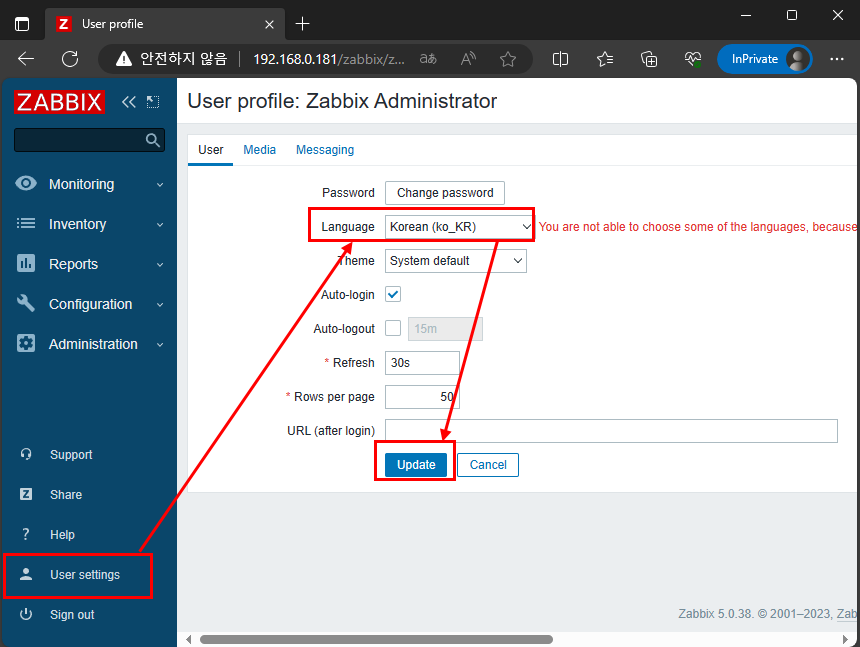
※ 언어 설정은 아래와 같이 변경 가능하다
- 서버에서 'language pack'을 설치하여야 언어 변경이 가능
- 참고URL : https://hkjeon2.tistory.com/27

※ 참고URL
https://hkjeon2.tistory.com/26
https://hkjeon2.tistory.com/27
https://tg360.tistory.com/entry/%EC%86%8D%EC%A0%84%EC%86%8D%EA%B2%B0-%EB%AA%A8%EB%8B%88%ED%84%B0%EB%A7%81-%EC%8B%9C%EC%8A%A4%ED%85%9C-%EA%B5%AC%EC%B6%95%ED%95%98%EA%B8%B0
'Infra > 기타(가상화 등)' 카테고리의 다른 글
| 가상화(하이퍼바이저, ESXi, vCenter, vSphere HA 등) (0) | 2024.01.15 |
|---|---|
| Zabbix 구성-2 (Zabbix Agent)(RHEL7) (0) | 2023.10.26 |
| 서비스 가동률(MTTR, 가용도 등 관련) (0) | 2023.08.31 |
| Network 기본 내용 (0) | 2023.08.13 |
| Haproxy + Keepalived를 이용한 웹 로드밸런싱 구성 (0) | 2023.07.25 |